
Introduction
The idea was used on CynaraSource.com and I thought it’d make a nice tutorial… don’t even ask why I was visiting a site dedicated to artichokesStep 1
Begin by opening a new document, mine is 540×300 at 72ppi as usual.In the Tools bar set your foreground and background colors to #67774b and #303824 respectively then choose the Rectangular Marquee tool my pressing the M key. Drag a selection around the top 2/3 of the document as shown below.

Step 2
With the selection made, switch to the Gradient tool and make sure that the Foreground to Background setting is selected from the top-bar and that Linear Gradient is also selected.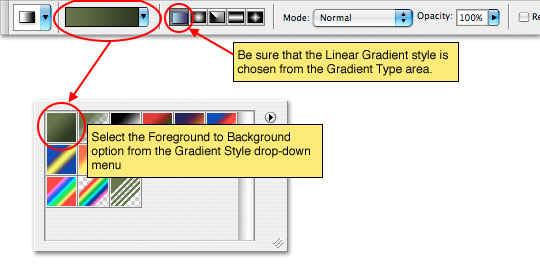
Step 3
Click and drag from the bottom of your selection to the top to lay down a Linear Gradient.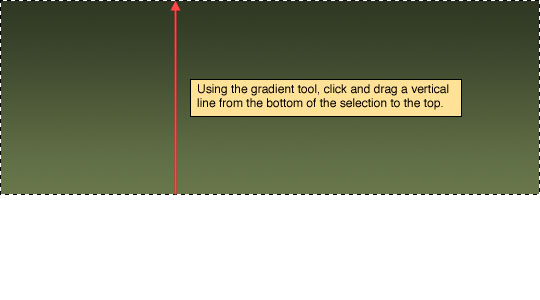
Step 4
Invert the selection now by choosing Select>Inverse from the main menu or simply press Command-I (PC: Ctrl-I) to invert the selection using your keyboard. Once the selection is reversed and with the Gradient tool still selected, drag a line from the top of this selection to the bottom like the example below.
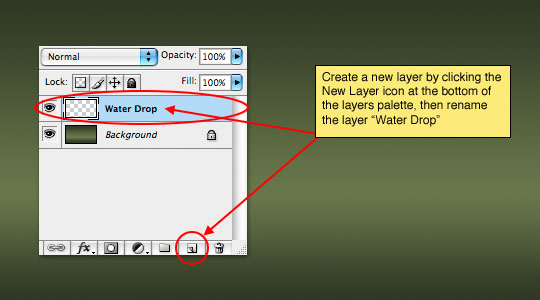
Step 5
Deselect by pressing Command-D (PC: Ctrl-D).Create a new layer by clicking the new layer icon at the bottom of the Layers palette or by choosing Layer>New>Layer… from the main menu. Double click on the layers name in the Layers palette and call this layer "Water Drop".
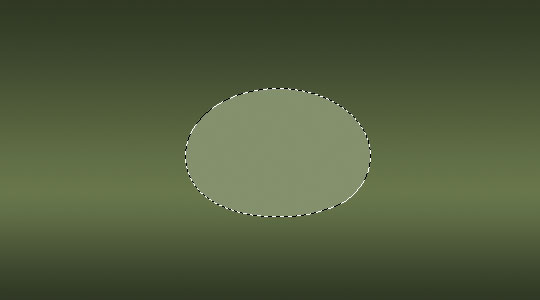
Step 6
In the Tools bar change the foreground color to a green which is lighter than the lightest green we used for the gradient, I used #7f8a69.Switch to the Elliptical Marquee tool (which can be found in the fly out menu activated by clicking and holding your mouse on the Rectangular Marquee tool in the top left corner of the Tools palette), then drag out a nice drop-shaped oval on the stage like the one below. We are going to build the drop rather large, then scale it down to get the desired effect later.
With your selection made, press Option-Delete (PC: Alt-Backspace) to fill the new selection with the light foreground green we just selected then deselect by pressing Command-D (PC: Ctrl-D).
Step 7
Bring up the Layer Styles dialog box by double clicking on the layer thumbnail in the Layers palette and apply the following 3styles then click OK.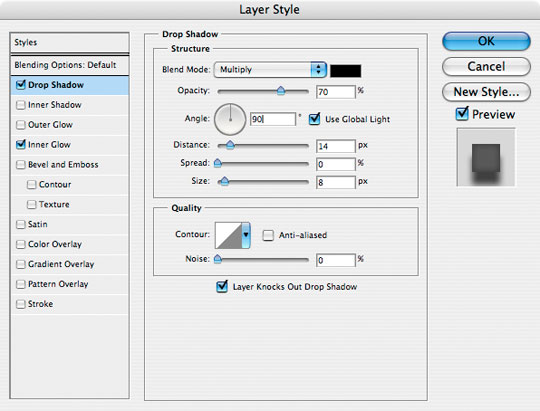
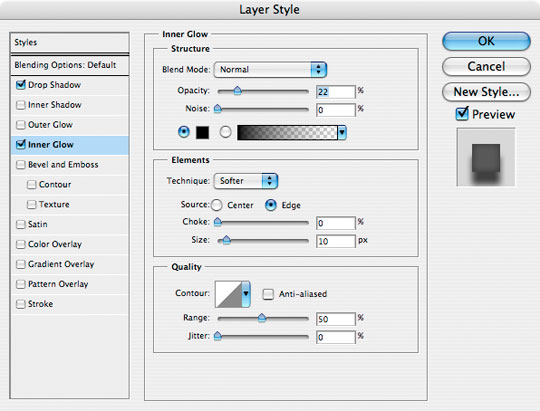
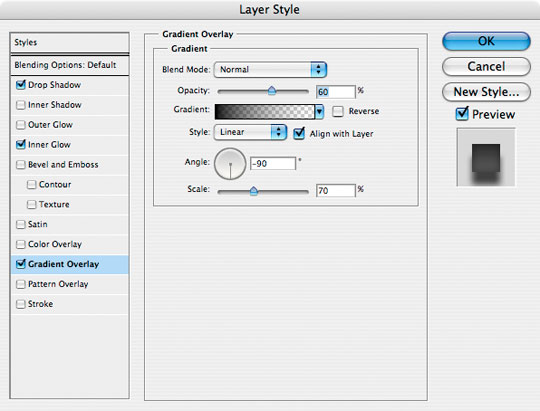
Step 8
Your drop should look like this.
Step 9
Create a new layer just like you did in step 5 and name it Drop Highlight. Switch to the Brush tool by pressing the B key and choose a round brush with soft edges about 45 pixels in diameter with a hardness of 0%.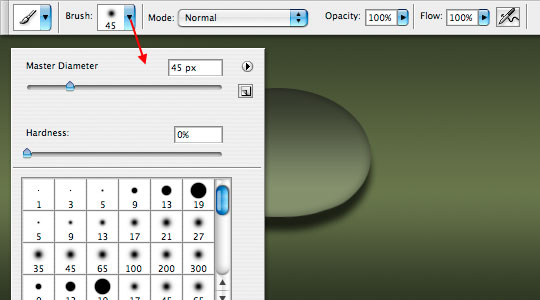
Step 10
Press the D key to reset the foreground colors to Black and White, then press the X key to switch the foreground and background colors, thus making the foreground color white.Place the brush where the highlight for the droplet should go and click once.

Step 11
Now lets transform the highlight to ovalize and tilt it for a little more realism. Press Command-T (PC: Ctrl-T) to activate the Free Transform tool and using the anchor points stretch and rotate the highlight until it looks satisfactory. Press Return (PC: Enter) to commit the transformation.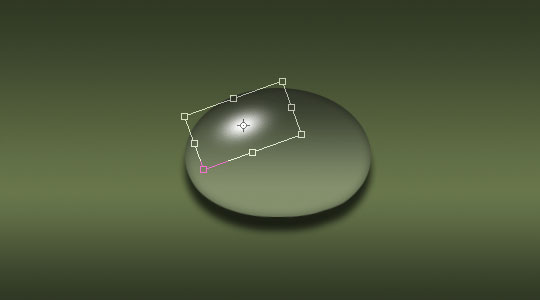
Step 12
Follow the next few steps very carefully:1) With the "Drop Highlight" layer still selected in the Layers palette, hold down the Shift key and click on the Water Drop layer (this will make it so both layers are selected at the same time).
2) Ctrl-Click (PC: Right-Click) on either layer and choose Duplicate Layers. A box will come up asking you to name the layers, just click ok. This will create two identical layers above the two layers we just had selected and the two new layers will now be highlighted.
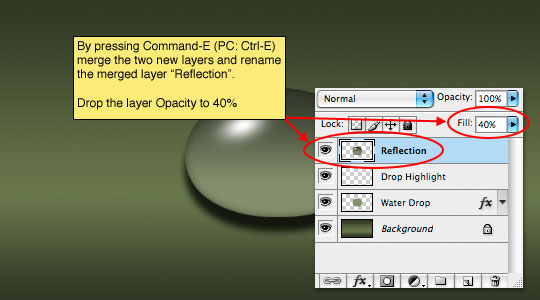
3) Press Command-E (PC: Ctrl-E) to merge the two selected layers together then rename the layer "Reflection" and lower it’s Fill opacity to 40%.
Step 13
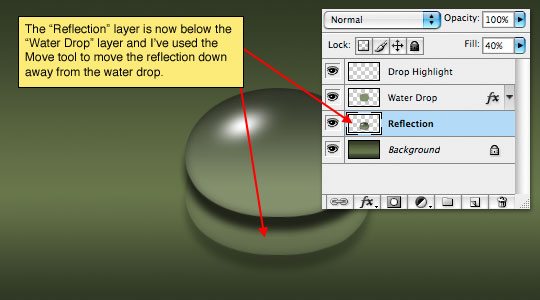
Now lets move the "Reflection" layer below our other two layers by pressing Command-[ (PC: Ctrl-[) or by simply grabbing the layer and dragging it below the other two layers.Switch to the Move tool by pressing the V key and click and drag the reflection down until it looks like the one below.
Step 14
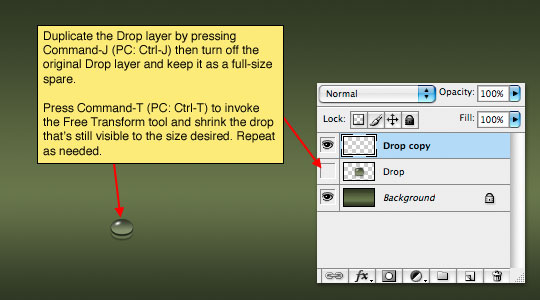
At this point our drop and reflection are complete and ready for sizing and placement. With the "Reflection" layer selected, hold down the Shift key and click on the "Drop Highlight" layer to select all three layers the comprise our droplet then press Command-E (PC: Ctrl-E) to merge the three layers together. You may want to rename the merged layer Drop or something so you know what’s on it.Press Command-J (PC: Ctrl-J) to Duplicate the layer, then turn off the first copy and keep it hidden as your full-size drop. This will be useful if you want to duplicate and transform more drops so that you’re not loosing information during transformation each time.
With the new layer selected press Command-T (PC: Ctrl-T) to invoke the Free Transform tool just like we did before, now just drag the corners until the drop is a sufficient size. (*note: holding the Shift key will constrain the transformation) – Repeat this duplication and transformation process as desired.
Step 15
In my final example I thought I’d add the iPod Shuffle we created in an earlier lesson in a red color with it’s own reflection to add a little more depth to the project.
No comments:
Post a Comment